Optical Star Quilt
The incredible Optical Star Quilt uses the art of optical illusion to create stunning depth and movement. The pink and green stars seem to stand out, but if looked at differently, the blue and white stripes form diamonds and stars of their own. The green and pink star centers appear to be circles, but there are no curved edges in the quilt. This paper-pieced quilt will definitely text your limits, and requires time, patience, and a skilled hand. Are you up for the challenge?
Project TypeMake a Project
Quilt Size34 inches wide x 34 inches long
Time to CompleteA month or more
Primary TechniquePieced
MATERIALS:
-
Fabric yardages are for 44/45” fabrics.
-
White, off white, or other light fabric: ½ yard
-
Coral, or pink fabric: 5/8 yard
-
Dark Blue fabric: 2½ yards includes backing, border and binding.
-
Pistachio green, lime green or other medium green: 1 yard
-
Thread
-
16 copies of the foundation paper piecing patterns (each section has two pages so you will need 16 copies of each.)
-
Rotary cutter, mat, and ruler
-
Pins.
INSTRUCTIONS
Cutting the fabric:
The fabric is cut into strips that will fit the foundation pattern resulting in less trimming.Cut the following strips the width of the fabric. The smaller parts of each section can be cut from the unused strip scraps.
-
Cut ¾ yard of dark blue fabric into 2½” wide strips. Leave the rest for backing.
-
Cut the white fabric into 2½” wide strips.
-
Cut the green fabric into 4½” wide strips.
-
Cut the pink fabric into 5” wide strips.
Assembling the Units:
-
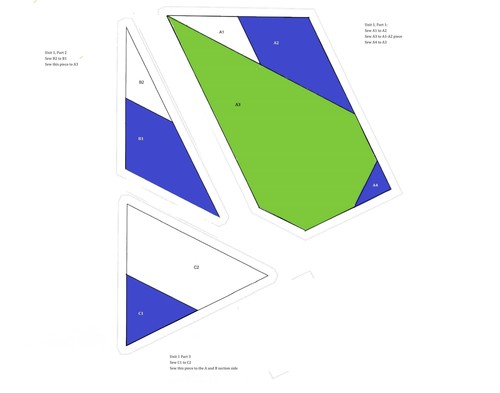
Sew the fabric onto the foundation patterns as shown in the following diagrams.
-
Trim each seam to 1/4”, remove paper from the seam and press toward the dark fabric.
Unit 1 : Sew A 1 to A2; Sew this part to A3; Sew A4 to A3.
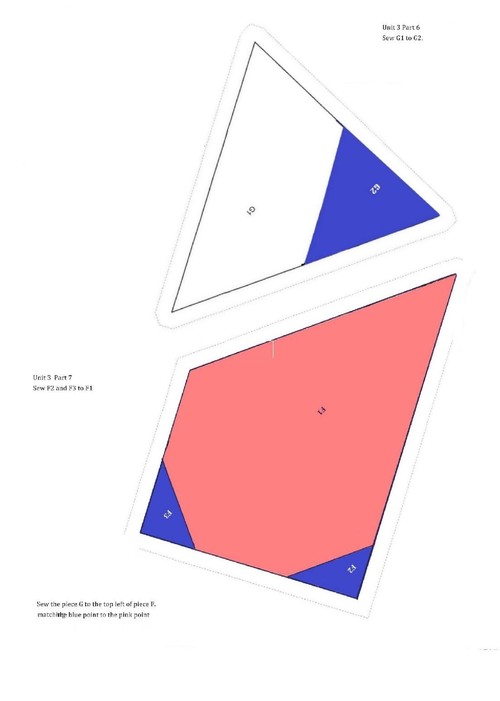
Unit 2: Sew F2 and F3 to F1; Sew G2 to G1; Sew the G section to the F section.
Unit 3: Sew D2 to D1; Sew E2 to E1; Sew E3 to E1-E2. Sew D section to E section
Sew D3, D4, and D5 to D 2.
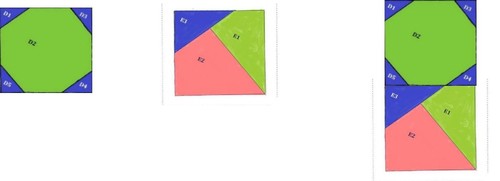
Sew Unit 3 (D-E) and Unit 2 (F-G) together, then sew on Unit 1 (A,B-C)
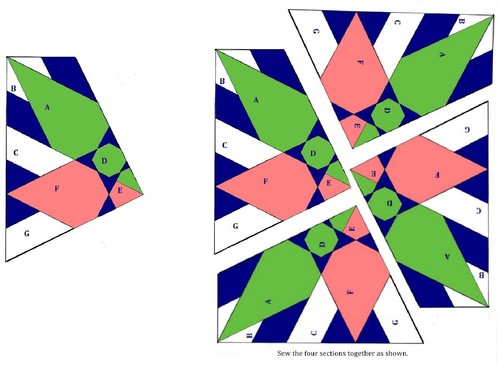
This is the completed section. Make 4 of these sections for one block.
To make sure that the points where the seams meet on adjoining pieces, place a straight pin vertically at the point where both seams meet. Keep this pin vertical as a pin is inserted in and out on each side of the vertical pin, then remove it. When sewing the seam, keep the pins in place, hand turning the wheel to make the needle move over each pin before removing it. Carefully remove the paper from the back.
Use the 2 ½” blue strips for the border. The rest of the strips will be used for binding.
Assemble Quilt:
- 45” square piece of fabric should be plenty big enough for this quilt. Use a low loft batting. Layer the top, batting and backing. Saftey-pin or baste the layers together. Quilt as desired. Trim away the excess. I like to zig-zag around the edge of the quilt. This keeps the batting, backing and top, smooth and even for binding.
- Use the 2½ “ strips of the dark blue for binding. Miter the short ends of the strips together to create a continuous binding strip. Iron this strip in half lengthwise. Sew binding onto the quilt front. Fold it over to the back of the quilt and hand sew in place making sure the zig zag stitching is covered.
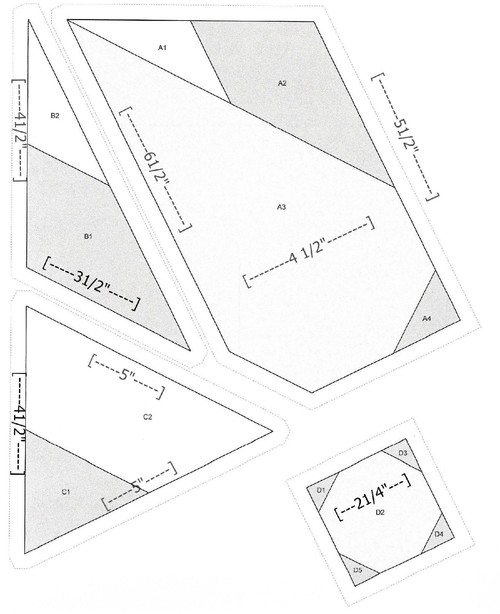
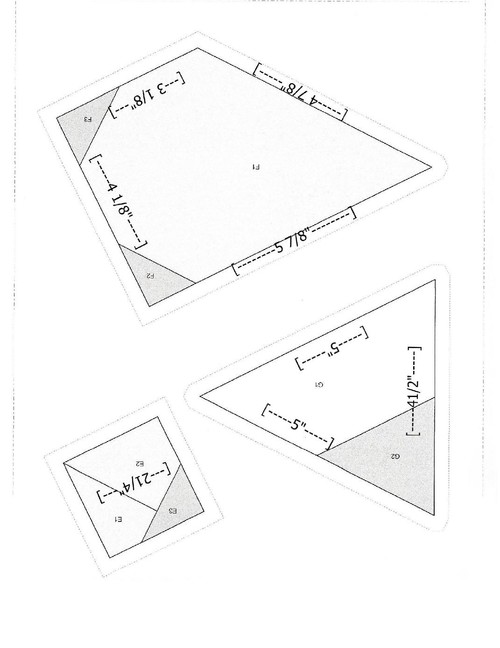
- The paper piecing patterns are below. You will need four of each pattern for one block, sixteen for four blocks.
- The measurements are on each piece to show what the actual size is. Sometimes the copies are not the actual size so refer to the measurements for accuracy.
