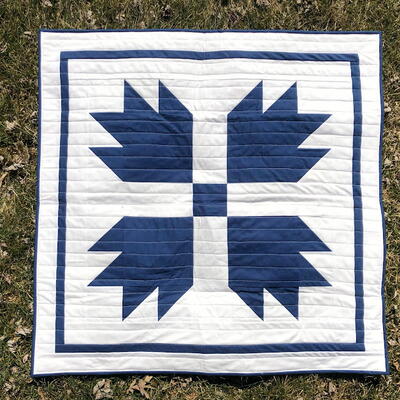
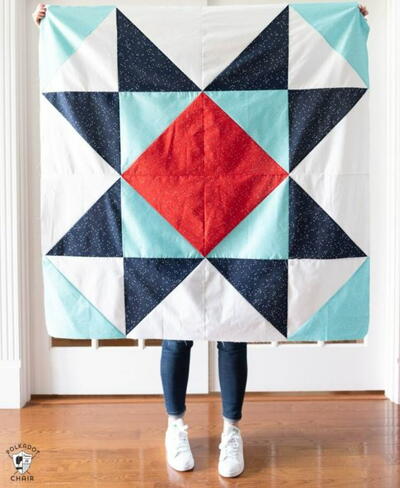
Baby Bear Quilt Pattern

From the Designer: "Earlier this year I made a few baby quilts and today I'd like to share the pattern for one of them with you! This was a super fun and super fast quilt to make! You make one very large bear paw block and add a few borders and that's it! You could do this in any dimensions that you'd like but my finished quilt measures 40 1/2" square."

Materials List
-
Yardage is based on 42” -wide fabric
- 7/8 yards Solid navy fabric
- 1 yard Solid white fabric
- 1/2 yard of binding fabric
- 1 1/4 yards of backing fabric
- 46” x 46” piece of batting
INSTRUCTIONS
Basics Instructions:
- Read through the instructions before beginning
- All seams are sewn with ¼” seam allowance unless noted
- RST means right sides together
- HST means half square triangles
- WOF means width of fabric
Cutting:
From the solid navy fabric, cut:
- 1 strip, 4 7/8” x 42”, crosscut into 8 squares, 4 7/8” x 4 7/8”, cut each square on one diagonal to yield 2 triangles per square for a total of 16 triangles
- 1 strip, 8 1/2” x 42”, crosscut into 4 squares, 8 1/2” x 8 1/2”
- 1 strip, 4 1/2” x 42”, crosscut into 1 square, 4 1/2” x 4 1/2”
- 4 strips, 1 1/2” x 42”
From the solid white fabric, cut:
- 1 strip, 4 7/8” x 42”, crosscut into 8 squares, 4 7/8” x 4 7/8”, cut each square on one diagonal to yield 2 triangles per square for a total of 16 triangles
- 2 strip, 4 1/2” x 42”, crosscut each strip into 2- 4 1/2” x 12 1/2” pieces and 2- 4 1/2” x 4 1/2” squares for
- a total of 4- 4 1/2” x 12 1/2” pieces and 4- 4 1/2” x 4 1/2” squares
- 7 strips, 2 1/2” x 42”
From the binding fabric, cut:
- 5 strips, 2 1/2” x 42”
Making the Blocks:
Use a 1/4” seam allowance. Press all seam allowances in the direction indicated by the arrows.
-
Using one triangle cut from the 4 7/8” squares of white and one triangle cut from the 4 7/8” squares of navy, sew one white triangle to one navy triangle to make a half square triangle (HST). Press. The HST should measure 4 1/2” x 4 1/2”, including the seam allowance. Repeat these steps to make a total of 16 HSTs.
-
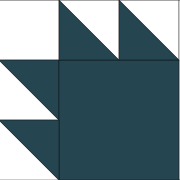
Using 4 HSTs made in step 1, 1- 4 1/2” x 4 1/2” square of white, and 1- 8 1/2” x 8 1/2” piece of navy, make one paw as shown below. The paw should measure 12 1/2” x 12 1/2”, including the seam allowance. Repeat these steps to make a total of 4 paws.
-
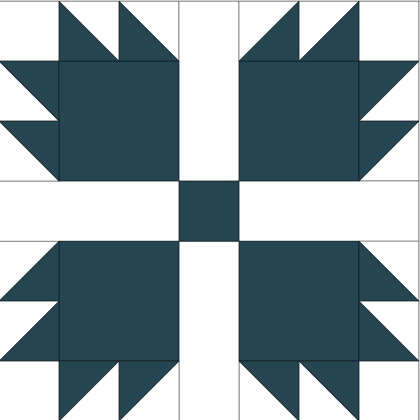
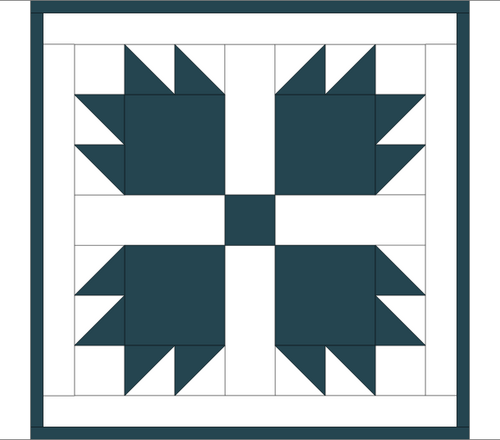
Using 4 paws made in step 2, 4- 4 1/2” x 12 1/2” pieces of white, and 1- 4 1/2” x 4 1/2” square of navy, sew them together as shown below. Press. The bear paw block should measure 28 1/2” x 28 1/2”, including the seam allowance.
Assembling the Quilt Top:
-
For the first border, join 3- 2 1/2” x 42” strips of white together end to end. Trim two pieces measuring 28 1/2” long. Sew these strips to the sides of the quilt top. Press. Trim the two strips to 33 1/2” long. Sew these strips to the top and bottom edges of the quilt top. Press. The quilt top should now measure 33 1/2” x 33 1/2”, including the seam allowances.
-
For the second border, join 4- 1 1/2” x 42” strips of navy together end to end. Trim two pieces measuring 33 1/2” long. Sew these strips to the sides of the quilt top. Press. Trim the two strips to 35 1/2” long. Sew these strips to the top and bottom edges of the quilt top. Press. The quilt top should now measure 35 1/2” x 35 1/2”, including the seam allowances.
-
For the third border, join 4- 2 1/2” x 42” strips of white together end to end. Trim two pieces measuring 35 1/2” long. Sew these strips to the sides of the quilt top. Press. Trim the two strips to 40 1/2” long. Sew these strips to the top and bottom edges of the quilt top. Press. The quilt top should now measure 40 1/2” x 40 1/2”, including the seam allowances.
Finishing the Quilt:
-
Layer the quilt top, batting, and backing. Baste the layers together.
-
Hand or machine quilt as desired.
-
Using the 5- 2 1/2” strips of binding fabric, make the binding and attach it to the quilt.
-
Your project is finished! If you love this tutorial, be sure to check out Janome.com for even more inspiration.
Read NextWhite Baby Quilt Pattern