Tic-Tac-Toe Mini Quilt Pattern

Transform your quilting skills into playful creativity with our free quilting pattern for a fabric tic-tac-toe set. This delightful project is perfect for quilters of all levels, guiding you through crafting a charming game board and fabric game pieces. Each square and piece is lovingly quilted, making this set not only a fun game but also a beautiful handmade keepsake. Ideal for family gatherings or as a unique gift, the fabric tic-tac-toe set combines the joy of quilting with timeless entertainment. Dive into this project and create a cozy, interactive addition to your home that will be cherished for years to come.
Time to CompleteIn an evening
Main MaterialFabric
Primary TechniqueQuilting

Project TypeMake a Project
Materials List
- (1) 1/4” yard of white fabric
- (1) 1/4” yard of pale pink fabric
- (1) 8” x 8” square of batting
- Matching thread
- (1) 1/4” yard of coordinating ribbon
- General sewing notions
INSTRUCTIONS
Cutting Instructions:
- Cut (4) white 2 1/2” x 2 1/2” squares
- Cut (5) pale pink 2 1/2” x 2 1/2” squares
- Cut (1) white 8” x 16” rectangle
- Cut (2) pale pink 2 1/2” x 8” rectangles
- Cut (1) 8” x 8” white backing
Game Board Sewing Instructions:
-
Sew your 2 1/2” squares together in rows, alternating colors.
-
Press the seams open.
-
Sew your rows together, top to bottom, aligning the rows.
-
Press open the seams.
-
You should now have a completed nine-patch quilt block.
-
Layer the batting, backing and machine quilt as desired.
Note: For this project, Christopher used the 1/4” presser foot as a guide when sewing together his nine-patch block. It is a great way to ensure he gets an accurate 1/4” seam allowance.
Christopher also opted out of using the walking foot. He used the regular presser foot. Because this project is small, Christopher knew the fabric would glide right through the machine.


Storage Bag Sewing Instructions:
-
Using the (2) 2 1/2” x 8” rectangles, create a pale pink bias rectangle stripe by pressing the rectangle in half. Open up the rectangle and press the left and right side toward the center press line.
-
Sew (1) pale pink bias strip rectangle to each end of the (1) 8” x 16” white rectangle, a 1/4” from the edge.
-
With the right sides together, sew the left and right side of the storage bag together.
-
Flip the storage bag inside out, pressing it flat.
Note: You could use pre-purchased bias tape to use on this project. It is a super quick and easy finish.
Use your coordinating ribbon to tie the bag together when storing the game board and pieces. -
Your project is finished! If you love this tutorial, be sure to check out Janome.com for even more inspiration.


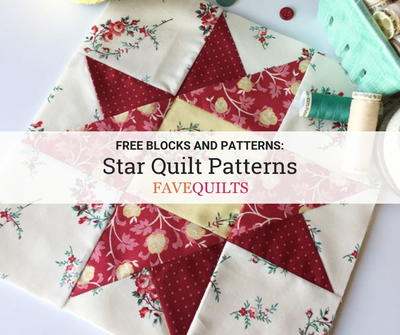
Read Next45 Free Star Quilt Patterns