Charming Ivy Trellis Quilt
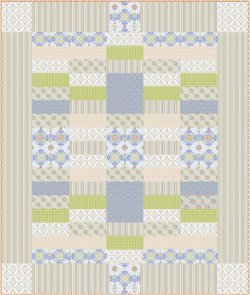
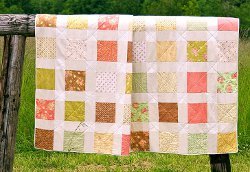
Queen sized quilts don't have to be complicated or time consuming. This easy quilt pattern fits a queen sized bed, but will only take you a week or so to make. The Charming Ivy Trellis Quilt has a simple pattern of large, rectangular blocks that you can piece together easily. This quilt is definitely easy enough for a beginning quilter!
Project TypeMake a Project
Quilt Size81 inches wide x 96 inches long
Time to CompleteA week or two
Primary TechniquePieced

Notes: This pattern is designed using fabrics from the Ivy Trellis collection by Gabriella Hunter for Riley Blake Designs. Fabrics are coded in materials list. Measurements include 1/4” seam allowances. Sew with right sides together unless otherwise stated.
MATERIALS:
- 1-3/8 yard Purple (6020)
- 1-1/4 yard Purple (6021)
- 3/4 yard Purple (6022)
- 5/8 yard Purple (6026)
- 5/8 yard Celery (6024)
- 5/8 yard Periwinkle (6023)
- 3/8 yard Coral (6025)
- 3 yards Purple (6027) Border
- Backing 6-1/2 yards
- Binding 3/4 yard
INSTRUCTIONS:
Cutting Directions:
Quilt Center:
- 54 small rectangles 12-1/2” x 5“ of varied colors
- 8 long rectangles 24-1/2” x 5” of 2 different colors
- 5 large squares 12-1/2” x 14”; 3 of one color and 2 of another
Quilt Border:
- 6 squares 10-1/2” x 10-1/2” for top and bottom of the border
- 4 strips 10-1/2” x 25-1/2” for top and bottom of border
- 2 strips 10-1/2” x 76” for sides of border
Quilt Assembly:
Quilt Center: Please refer to the quilt photo for the placement of fabric colors and the quilt layout.
- The first section: sew one long rectangle (24-1/2” x 5”) to a small rectangle (12-1/2” x 5”) sew this to one more long rectangle forming a complete section. Sew 4 of these sections.
- The second section: sew 5 small rectangles (12-1/2” x 5”) end to end forming a complete section. Sew 4 of these sections.
- The third section: sew 3 small rectangles (12-1/2” x 5”) together to form a rectangle square. This should measure 12-1/2” x 14”. Sew 2 of these rectangle squares side by side matching seams and sew to the 14” side of the large square. Sew 2 more rectangle squares and sew to the other 14” side of the large square. Sew 2 of these sections.
- The fourth section: sew a large square to a rectangle square (3 small rectangles 12-1/2” x 5” sewn together). Sew another large square, then a rectangle square and finish the section with a large square. Make one of these sections for the center section of the quilt.
- Sew each section together matching seams to form the center of your quilt.
Quilt Border:
- Sew each side border (10-1/2” x 76”) to center of quilt. Sew corner block (10-1/2” x 10-1/2”) to top quilt border strip (10-1/2” x 25-1/2”), sew to middle block (10-1/2” x 10-1/2”), sew another top quilt border strip (10-1/2” x 25-1/2”), and then finish by sewing a corner block (10-1/2” x 10-1/2”). Sew this row to the top of your quilt and repeat for the bottom of your quilt.
- Bind with your favorite fabric from the Ivy Trellis Collection.

Read NextNostalgic Fat Quarter Quilt
Your Recently Viewed Projects
kclayton77 1957178
Dec 08, 2023
As an added pointI do see the squares in the top and bottom of the border in the original photo in my email but not in the photo of the directions. But still am puzzled about the size of the squares that are listed in the in directions as to be cute at 12.5 X 14.
kclayton77 1957178
Dec 08, 2023
I was going to try to make this but the directions have me puzzled. In the cutting directions it says for the quilt border to cut 10.5 squares for the top and bottom of the borders. I do not see where the photo shows squares in the border. It also states in the cutting directions for the quilt to cut a square 12.5 x 14. That would not be a square and it is hard to tell in the picture of the quilt if it is a square or a rectangle and definitely hard to know the exact dimensions of it. Is there an update somewhere with corrections made? Thank you for your help in resolving these issues.
Report Inappropriate Comment
Are you sure you would like to report this comment? It will be flagged for our moderators to take action.
Thank you for taking the time to improve the content on our site.

