Fabulous Fringe Pillow
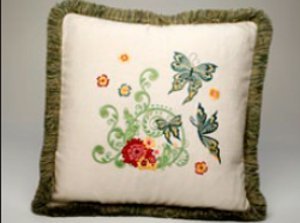
Need a little fun to shake up your home decor? Then get things shaking with the Fabulous Fringe Pillow. Not only will you be making fun pillows to sew, but also decorating them with these embroidery machine quilt designs. Your sewing skills will improve so much just from what you'll be working on to make these pillow designs. Any room in your house can have a designer touch with these pillows that look like they were bought from the highest quality of designs stores.

Janome Supplies:
- MC9900
-
A foot (9mm)

- P foot
- Buttonhole foot
- Janome Embroidery Thread
- Janome pre-wound bobbins
- Janome Blue Tip needle
- Clothsetter
Fabric and Notions:
- 5/8 yd heavy linen
- 4 1/2 yds 2" fringe
- 18" down filled pillow form
- All purpose thread to match fabric
- Three 3/4" buttons
- Tear away stabilizer (such as Jenny Haskins Tearaway Magic)
- Hand sewing needle
- Quilter's chalk pencil
- Transparency film or vellum
Instructions:
-
Cut an 18 1/2" square for the pillow front. Cut two 18 1/2" x 12" panels for the pillow back.
-
Included with your new MC9900 is a CD with printable templates of each embroidery design. Print templates on transparency filim or vellum. It is helpful to be able to see through the template when creating arrangements, and an added bonus is that you can flip the template for reversed designs. [fig. a]


-
The large arrangement created for the linen pillow uses Favorite Designs for the SQ14 Hoop, #3, #4, #5, #6, and #7 and Favorite Designs for the RE20 Hoop, #1. Print multiples of each design so you have plenty of options when creating an arrangement. Our sample uses three templates each for SQ14 #7, #5, and #6, and one each of the remaining designs.
-
Arrange, flip and rotate the templates to create a large arrangement, about 10" x 11" in size. Tape the templates in place so that they can be positioned on the pillow fabric.
-
Center the arrangement on the pillow top. Mark the crosshairs of each design, including the arrow.
-
Secure the inner frame of the hoop in the appropriate position on the clothsetter. Place stabilizer and fabric over the hoop. Lower the arm and move the fabric so that the crosshairs match the position of the first embroidery design. Hold the fabric in place and lift the arm. Place the outer hoop in place, making sure the crosshairs are still matching and push the outer hoop into place. Tighten the hoop if necessary. Embroider the first design. Remove the hoop from the machine and remove excess stabilizer from the design.

-
Repeat these steps for each embroidery design in the arrangement.
-
Press under a double 1" hem on each pillow back. Edge stitch along each side of the hem. Make three buttonholes, spaced 5" apart on one pillow back, centered on the double hem.
-
Sew two layers of fringe to the pillow front, pivoting at the corners.
- To complete the pillow, sew the pillow front and back together with a 1/2" seam. Trim the corners (not the fringe) and turn right side out. Insert the pillow form, pushing the corners of the pillow form in to the corners of the pillow. Sew buttons to the pillow back matching the buttonholes. Remove the chain stitch that holds the fringe together, and fluff to blend the two layers.

Read NextThree Panel Patchwork Cushions

