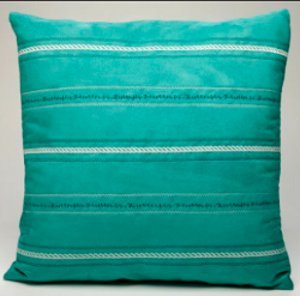
Secret Stitches Turquoise Pillow
Even the simplest of pillow designs can have something that makes it really special. Just take a look at the Secret Stitches Turquoise Pillow. Using a sewing machine, you'll be able to add little messages to your basic designs for pillows with the machine embroidery designs. Your sewing skills will really be put to the test, and the results will look incredible. You can make your own little trademark or saying and use an embroidered quilt pattern to label all of your works.

Janome Supplies:
- MC9900
- A foot (9mm)
- F foot (9mm)
- Border foot (9 mm)(optional accessory)
- Janome Embroidery Thread
- Janome pre-wound bobbins
- Janome Blue Tip needle
Fabric and Notions:
- 5/8 yd decorator weight microfiber
- 18" down filled pillow form
- All purpose thread to match fabric
- Tear away stabilizer (such as Jenny Haskins Tearaway Magic)
- Hand sewing needle
-
Quilter's chalk pencil

Instructions:
-
Cut two 18 1/2" squares for the pillow front and back.
-
Cut a matching square of tear away stabilizer. It may be necessary to piece the stabilizer to make the proper sized square. Pin the fabric to the stabilizer at the corners.

-
Mark the pillow with a straight line, centered vertically on the pillow.
-
Measure and mark two lines on each side of the center line, spaced 3" apart. There are now five marked lines.
-
Set up the MC9900 with the F foot and white embroidery thread, with bobbin thread in the bobbin.
-
Select the Decorative Stitch tab. The screen will show 6 groups of decorative stithes. Select Decorative Stitches and press Stitch #7.
-
Sew a line of decorative stitches along the first, third and fifth marked lines.
-
Change the thread to a dark turquoise embroidery thread.
-
Select Lettering, the button with the A. Press the button for Script. The screen now shows a key pad with uppercase letters. Press B. [fig. a]
-
There is a row of red buttons at the top of the screen. The third button changes uppercase letters to lowercase letters. Use a combination of lowercase and upper case letters to write "Butterfly Flutter by". [fig. b]
-
Sew the lettering along the second and fourth line.
-
Select the Decoratiev Stitch tab. Select Heirloom Stitches, Stitch #13. Sew a row of decorative stitches on each side of the rope stitch, using the F foot for spacing.
-
Change the thread back to white embroidery thread, and sew a row of decorative stitches on each side of the lettering, using the F foot for spacing.

- To complete the pillow, sew the pillow front and back together with a 1/2" seam, leaving a 6" opening on one side for turning. Trim the concerns and turn right side out. Insert the pillow form, pushing the corners of the pillow form into the corners of the pillow. Fold under the opening and pin in place with the folded edges matching. Hand sew the opening closed.
Read NextHow to Make a Quilted Pillow Cover

