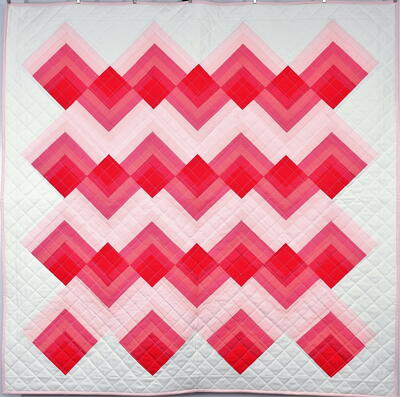
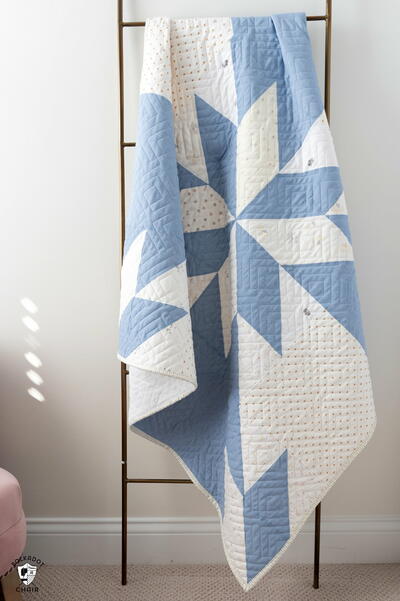
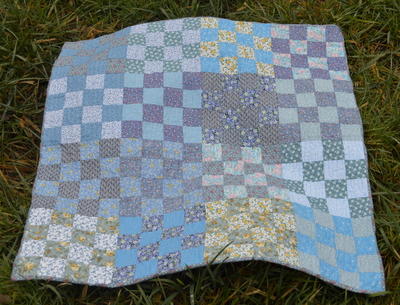
Cascading Diamonds Baby Quilt Pattern

The Cascading Diamonds Baby Quilt is a vibrant pattern that combines tradition with modern style. Embracing the classic log cabin style of quilting as its foundation, this quilt adds a contemporary twist with its bright use of color and unqiue design. Each block cascades gracefully into the next, forming a mesmerizing pattern reminiscent of glistening pink diamonds. Through meticulous arrangement and a bold color choice, this baby quilt becomes a captivating display of artistic expression that will bring such cheer to your nursery.
Time to Complete: 8-10 Hours

Materials List
-
Janome Supplies Required:
- HP Foot Part # 865803006
- HP Plate Part #865805008
- HP2 Walking Foot Part # 202415004
- Red Tip Needle Part #990314000
-
Fabric Requirements:
- Background and Border Fabric: 1 1/4 yard
- Fabric A: 1/2 yard (Lightest Fabric)
- Fabric B: 1/2 yard
- Fabric C: 3/8 yard
- Fabric D: 3/8 yard
- Fabric E: 1/4 yard
- Fabric F: 3/8 yard (Darkest Fabric)
- Binding: 1/2 yard
- Backing: 3 yards
-
Rotary Cutter/Ruler/Mat
- Basic Sewing Supplies
INSTRUCTIONS
Cutting Instructions:
-
Background Fabric:
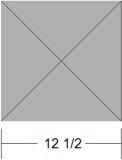
a. Cut 1 strip at 12 1/2” by width of fabric. Subcut strip into 3 squares at 12 1/2“ x 12 1/2”.
Subcut on both diagonals of each square to make a total of 12 triangles. 12 total triangles. The triangles will be the edge triangles.
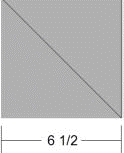
b. Cut 2 blocks at 6 1/2” square, subcut on one diagonal for a total of 4 triangles. These triangles will be the corner triangles. -
Fabrics A-E:
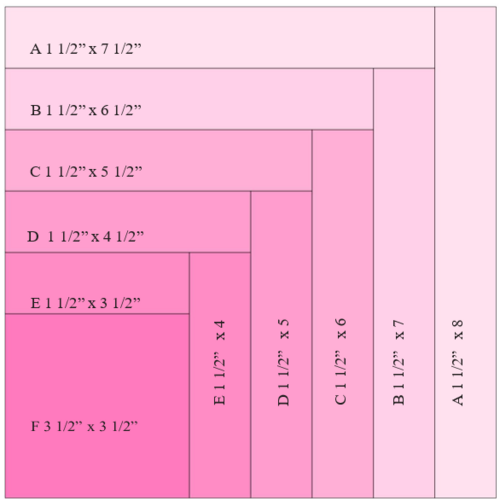
Cut yardage down to 1 1/2” strips by width of fabric. Subcut the fabric into the following cuts at 25 of each size.- Fabric A (lightest): 1 1/2” x 7 1/2” and 1 1/2” x 8 1/2”
- Fabric B: 1 1/2” x 6 1/2“ and 1 1/2” x 7 1/2”
- Fabric C: 1 1/2” x 5 1/2” and 1 1/2” x 6 1/2”
- Fabric D: 1 1/2” x 5 1/2” and 1 1/2” x 4 1/2”
- Fabric E: 1 1/2” x 4 1/2” and 1 1/2” x 5 1/2”
-
Fabric F (darkest):
Cut strips at 3 1/2” by width of fabric. Subcut strips down to a total 25 squares at 3 1/2” x 3 1/2”.
-
Border Fabric:
Borders will need to be pieced. Side borders are at 3” x 45 3/4”. Top and Bottom borders are at 3” x 50 3/4”
Sewing Instruction:
-
Block Construction
TIP: After stitching each fabric piece, press seam allowance to the 1 1/2” width pieces to help keep down the bulk and allow for flatter construction. All seams are stitched with a 1/4“ seam allowance.- Change needle plate to the HP Plate. Attach the HP foot to the machine. Use edge of foot for perfect 1/4” piecing. Insert Pink Tip Needle for piecing.
- Follow diagram below for stitch placement for each piece to make the diamond block. Stitch smaller length rectangle first for each color change. Begin with E stitched to F, D to E, C to D, B to C, A to B.
-
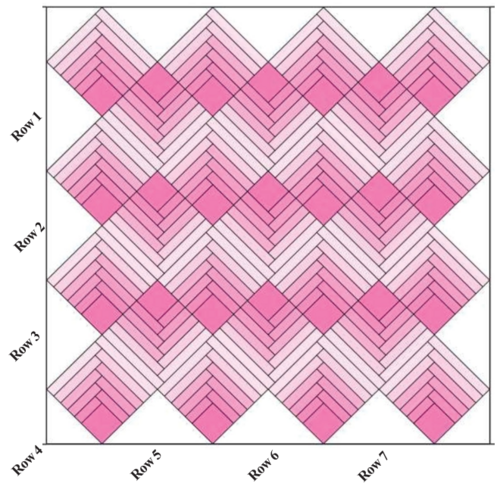
Row Construction
TIP: Rows are sewn in a diagonal direction or on-point.
Row 1: Stitch 1 corner piece to 1 side of the Diamond Block. Press towards corner piece. Stitch 1 edge piece on each side of Diamond Block/Corner Piece as shown below.
Row 2: Stitch in the following order: Edge, Diamond, Diamond Flipped, Diamond, Edge Row 3: Stitch in the following order: Edge, Diamond, Diamond Flipped, Diamond, Diamond
Flipped, Diamond, Edge
Row 4: Stitch in the following order: Corner Piece, Diamond, Diamond Flipped, Diamond, Diamond Flipped, Diamond, Diamond Flipped, Corner
Row 5: Stitch in the following order: Edge, Diamond, Diamond Flipped, Diamond, Diamond Flipped, Diamond, Edge
Row 6: Stitch in the following order: Edge, Diamond, Diamond Flipped, Diamond, Edge Row 7: Stitch in the following order: Edge, Diamond, Edge, Corner stitched onto Diamond
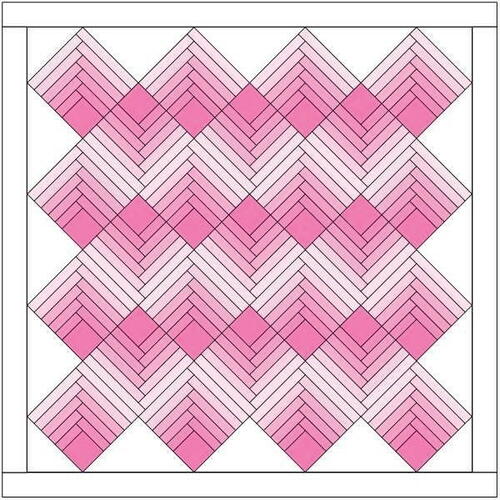
Stitch Row 1 to Row 2 and continue as shown until all rows are stitched together. -
Border Construction:
- Measure borders for correct measurements.
- Stich on side borders first.
- Finish with top and bottom borders to complete the quilt.
-
Binding Construction:
Cut 6 binding strips at 2 1/2” by width of fabric. Piece together to make one long strip for binding the bind as preferred. Method used on quilt photographed is attach binding to front of quilt, turn over and stitch down with a straight stitch using the HP2 foot. -
Quilting:
Due to the direct lines and geometric shape of the quilt, quilting was done using a 3” cross hatch to keep with the modern feel of the quilt design. HP2 foot was placed on the machine with a quilt guide bar to measure out desired distance.
-
Your project is finished! If you love this tutorial, be sure to check out Janome.com for even more inspiration.