Granny Love Quilt Pattern
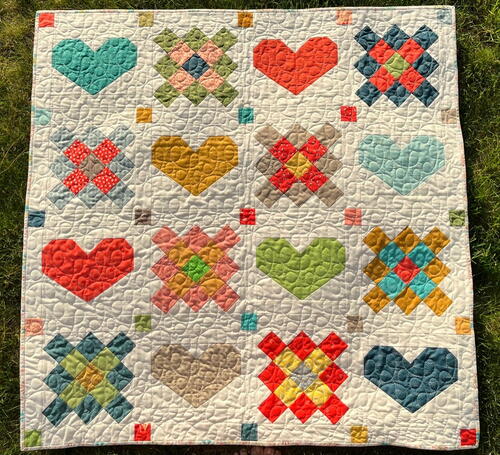
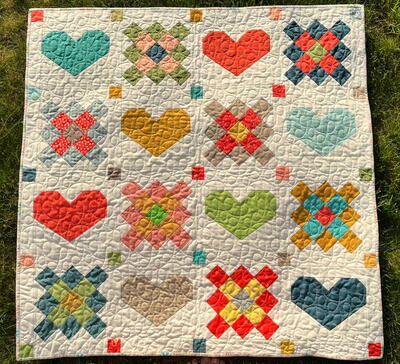
We're head over heels in love with the Granny Love Quilt Pattern! This beauty combines two of our favorite things, granny squares and hearts, giving this quilt a vintage, contemporary, and totally one-of-a-kind look. Add a little love to your life or send a little love to someone special with this quilt. Take a look at the detailed directions below to get an idea of how to piece this easy pattern. Then, download the free PDF quilt pattern to easily print and quilt your very own Granny Love Quilt!
From the Designer: "Using granny square and heart blocks to create this quilt, the 42” x 42” Granny Love quilt is so fun to make. This project can be used for a baby quilt or a picnic quilt, or as a wall hanging or tablecloth quilt. You choose!"
Find more pretty patterns from our friend Bonnie over at her blog, Lakegirlquilts.
Click Here to Download the PDF Pattern!
Join Our 100,000+ Fans And Sign Up to Receive Your FREE eNewsletter!
General Sewing Directions
- The directions for this pattern are for rotary cutting, machine piecing, machine quilting, and the binding is hand-stitched to the quilt back.
- Accurate cutting and sewing enhances your final product. Pin your pieces together before sewing them to ensure proper seam alignment.
- Use a ¼” seam allowance. I recommend using a special presser foot with a ¼” guide if you have one for your machine. This will help you get uniform seams, and matching corners!
- Follow the directions described below asyou press the seams.
Fabric Requirements
To achieve the scrappy look of this quilt I suggest using a variety of different light, medium, and dark colored prints, and a solid for the background. Fat eighth and fat quarter colored prints work great for this project, or raid your stash! I chose blues/teals, corals/oranges, greens, and yellow/golds with a white solid background. Use different colors if you’d like, there are no rules. Choose a coordinating fabric for the binding and for the backing.
- Light, Medium, and Dark Colored Prints: 1 1/2 yards total
- White Solid: 1 1/2 yards
- Binding: 3/8 yard
- Backing: 2 yards
- Batting: 50” x 50” piece of thin cotton batting
Cutting Directions
For Each Granny Square Block: Cut 1 – 2 1/2” x 2 1/2” center square; 4 – 2 1/2” x 2 1/2” middle squares; and 8 – 2 1/2” x 2 1/2” outer squares. (There are a total of 8 Granny Square Blocks)
For Each Heart Block: Cut 2 – 4 3/4” x 6 1/2” strips. (There are a total of 8 Heart Blocks)
White Solid: Cut 16 – 2” x 2” squares; 112 – 2 1/2” x 2 1/2” squares; 16 – 3 1/2” x 4 3/4” strips; 16 – 1 3/4” x 9” strips; and 40 – 2” x 9” strips
Binding: Cut 5 – 2 1/2” x 44” (width of fabric) strips
Backing: Cut 1 – 44” (width of fabric, trim off the bias edge) x 50” piece; and cut 2 – 8” x 25 1/4” pieces
Sewing a Granny Square Block
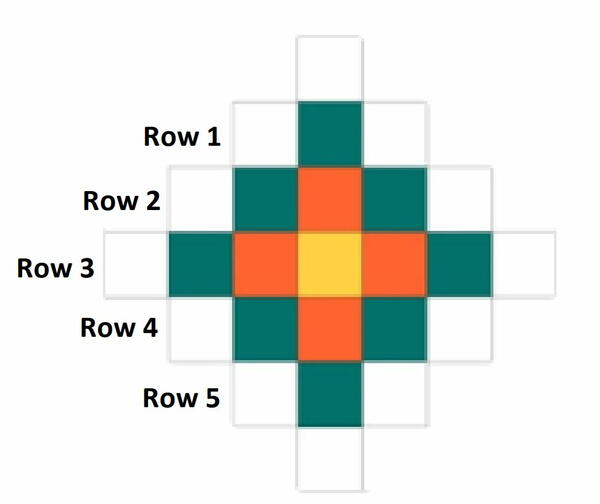
- Lay out the 1 – , 4 – , and 8 – 2 1/2” x 2 1/2” colored squares (light, medium, and dark) and 12 – 2 1/2” x 2 1/2” white squares to create this design.
- Sew the 3 squares together to form Row 1. Continue to sew squares together to form Rows 2 – 5. Press the seams of Rows 1, 3, and 5 to the right. Press the seams of Rows 2 and 4 to the left. Sew a white square to the top center of Row 1.
- Nest the seams of Rows 1 and 2, pinning them to hold the seams in place. Sew these two rows to each other. Continue to add onto this unit by sewing Row 3 to the bottom of Row 2, Row 4 to the bottom of Row 3, and Row 5 to the bottom of Row 4. Finish by sewing the white square to the bottom center of Row 5. Press seams either upward to downward so the block lays flat.
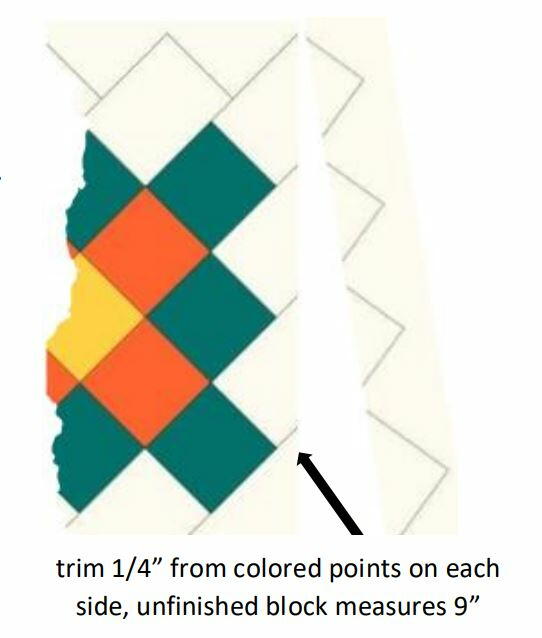
- Using a 12” square plastic ruler and rotary cutter trim the block 1/4” from the points of each of the outside colored squares, trimming off the points of the white squares. You don’t want to get closer to the points of the colored squares than 1/4” or you’ll lose their sharp points when you sew the blocks together. The block should measure 9” unfinished, trim to this measurement.
- Continue to sew the other 7 Granny Square Blocks. To achieve a scrappy look, vary the light, medium, and dark colored prints used so each block is unique.
Sewing a Heart Block
- Using a water soluble marking pen and a straight edge draw a diagonal line (on the back side) from one corner down to the opposite corner of 2 – 2” white squares, 2 – 2 1/2” white squares, and 2 – 3 1/2” x 4 3/4” white squares (lines facing opposite directions as shown here).
- Layout the 2 – 4 3/4” x 6 1/2” colored rectangles and the 2” and 2 1/2” squares as shown here, right sides together. Sew along the drawn line of each small square. Trim 1/4” from seam to remove the outer corners, open and press seams toward colored fabric.
- Measure 3 1/2” up along the outside edge of the colored fabric. Mark the spot with a pin. Then place the 3 1/2” x 4 3/4” white rectangle so the upper corner of the diagonal line aligns to the measured pin placement and the lower corner of the diagonal line aligns to the lower opposite corner, as shown here. Sew along the drawn line, trim 1/4” from seam to remove the outer corners, open and press seams toward the colored fabric.
- Repeat with other half, mirroring the placement of the white strips on the colored fabric as shown here. Sew the two halves of the heart together. Press seam to one side. Sew a 1 3/4” x 9” white strip to the top and bottom of the heart to finish the block. Press seams toward the white strips. The block should measure 9” unfinished. Repeat to make the other 7 Heart Blocks, varying the colors.
Assemble Quilt Top
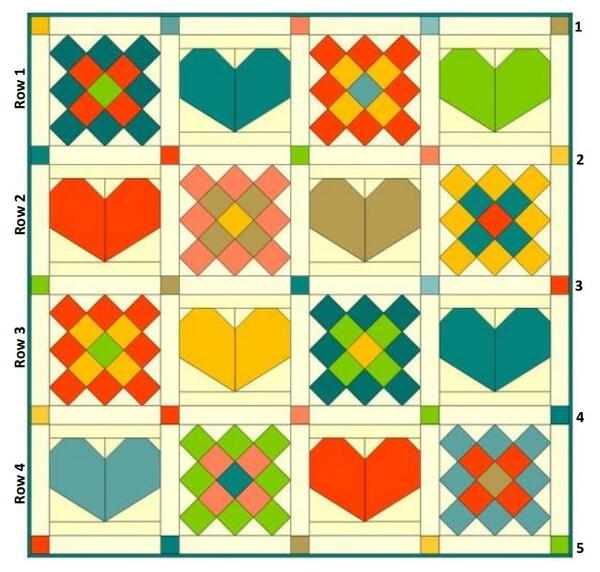
- Follow this diagram to lay out the 8 Granny Square Blocks, 8 Heart Blocks, and 25 – 2” x 2” colored squares until you are pleased with the distribution of colors in the quilt top.
- Sew a 2” x 9” sashing strip between each block to join the blocks together into Rows 1 – 4. Press seams toward white strip. Sew an additional 2” x 9” white strip to the sides of the two outside blocks of each row, press seams toward white strips.
- Connect the colored squares into rows of sashing by sewing a 2” x 9” white strip between each colored square. Press seams toward white strips. This will give you 5 rows of sashing.
- Connect Rows 1 – 4 together by sewing a row of sashing between each. Nest and pin seams to hold rows in place while you sew. Sew a row of sashing to the top and bottom rows to finish off the quilt top. Press seams toward rows of sashing.
Layering the Top, Batting, and Back
I refer to layering the quilt as “sandwiching”. You need to sandwich the top and back with the batting in the middle.
Prepare the Backing – Sew the 8” x 25 1/4” backing strips together to create an 8” x 50” piece. Sew this piece to the 44” x 50” piece (make sure the bias edges are trimmed!) to create a backing. This will allow the backing to extend about 4” beyond the edges of the quilt top.
Tape the Backing Down – On a hard surface floor, or with two large tables pushed together, use painter’s tape to tape down the backing fabric. As you tape the back down you’ll want to make sure the fabric is smooth, without wrinkles. Also, make sure the right side of the fabric is facing down!
Add the Batting – Lay the batting on top of the taped-down quilt back, and move your hands across it to smooth it all over. This will get rid of any wrinkles in the batting, and help to adhere it to the backing fabric.
Place the Quilt Top – Once you have the batting placed on top of the quilt back, center the quilt top over the two bottom layers. Right side facing up, of course! The two bottom layers of the quilt (the back and the batting) should extend about 4” all around the outside edges of the quilt top (2” for the pillow).
Move your hands across the quilt top to smooth it all over, and help remove any wrinkles. This will also help adhere the quilt top to the batting a little bit.
Baste the Layers – You can either spray baste your quilt layers or pin them together with 1 ½” stainless pins. Place pins around the entire quilt every 4 – 5 inches so the three layers don’t move around when you’re machine quilting this project. Again, make sure all wrinkles are smoothed out. Adjust basting if needed to remove any wrinkles.
“Quilting” the Quilt
Use whatever free-motion stitch you'd like, or use a straight stitch to quilt in the ditches or along the seams. You’ll need a darning foot to free-motion quilt, and you’ll need to either be able to lower the feed dogs on the machine or place a special cover over them. If you’re using a straight stitch to machine quilt you’ll need a walking foot.
Binding the Quilt
When you’ve finished quilting the layers together, it’s time to bind the edges of your quilt! You can use one color or several colors to make the binding!
Prepare the Binding – Fold each of the cut binding strips in half end to end. Use the 45° line on your plastic ruler to trim the ends at a 45° angle.
- When you open the strips the angles on the ends will be facing in opposite directions.
- Place the ends of two strips perpendicular, right sides together, and sew ¼” seam.
- Repeat to join all strips into one long binding strip. Press seams open, then press long strip in half lengthwise, right side facing out.
Sew the Binding Strip to the Quilt – Begin to sew the raw edge of the binding to the quilt by pinning it along one side. Be careful to sew the raw edge of the binding strip to the quilt, not the folded edge!
- I usually start sewing the binding strip in the middle of the quilt side that I’m starting with. Start sewing about 8” in from the end of the binding strip, leaving a hanging “tail” on the binding. You’ll sew this to the other end of the binding strip when you finish sewing all along the sides of the quilt.
- Stop sewing on the first side ¼” from the corner, use a pin to mark this location and sew right up to it. Backstitch a bit, and cut your thread but DON’T cut the binding strip.
Making the Mitered Corner – Now, remove the quilt and binding strip from your machine and fold the binding strip straight up so it’s perpendicular from the side you were just sewing on.
- Fold the binding strip back down on itself and match it to the edge of the quilt you just sewed it to, and the next edge of the quilt you’re about to sew it to. Pin this fold in place, and pin the binding strip to this edge of the quilt and continue to sew it, again stopping ¼” from the next corner and repeating the folding process described above. Continue in this manner until you are on the last side of the quilt, the side you started on.
Connecting the Ends of the Binding – Stop stitching about 14” – 16” from where you started. Backstitch and cut the thread (but not the binding strip, not yet!), remove the quilt and binding strip from the machine.
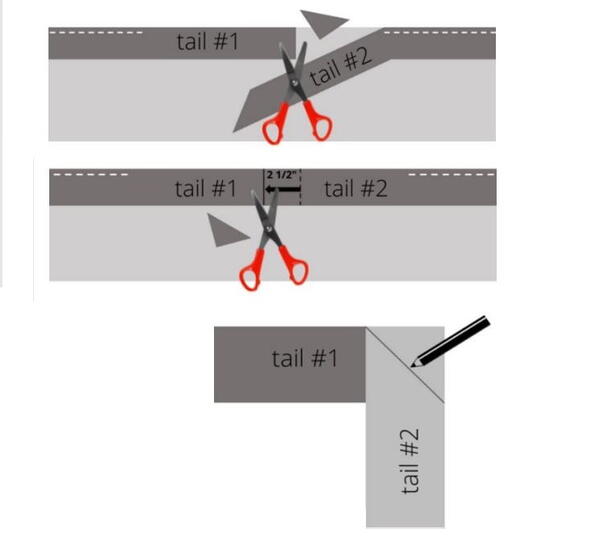
- You now have two “tails” of the binding strip, tail #1 from where you started stitching it to the quilt and tail #2 from where you ended. You’ll need to join these tails together so that you have a continuous binding strip to finish sewing down to the quilt. Follow the steps below to join the tails!
1) Lay tail #1 of the binding strip along the unsewn edge of the quilt. Trim it at a 90° angle about half way between this unsewn edge.
2) Lay tail #2 of the binding strip over tail #1 along the unsewn edge of the quilt. Measure 2 ½” beyond the trimmed straight edge of tail #1. Mark this 2 ½” measurement with a pin or pencil, and trim the tail #2 at a 90° angle also. The two trimmed binding strip tails should overlap by 2 ½”.
3) Unfold the two tails so they lay flat. Pin the two tails together perpendicular to each other (right sides together). Use a fine pencil to draw a diagonal line from the corner of tail #2 to the opposite side.
Sew along the drawn diagonal line. Fold binding strip in half again. The continuous binding strip should now lay flat along the unsewn edge of the quilt. If necessary, shorten or lengthen the continuous strip before trimming it. Then trim the outside corner ¼” from the seam and finger press the seam open. Fold it in half again and finish sewing the binding strip to the quilt.
Trim the Batting and Back – Trim the batting and quilt back to ¼” from the edge of the quilt top. I use a ruler and a rotary cutter to accomplish this task. Work carefully, so you don’t cut into your quilted project.
Hand-Stitch the Folded Binding Edge to the Quilt Back – Hand-stitch the folded edge of the binding strip to the back of the quilt. When you get to the corner, carefully turn the corner right-side out to make a nice, mitered corner. I tack a few stitches up the corner to hold it in place, and then continue stitching along all sides and corners until binding is complete.
Are you going to make your own Granny Love Quilt? Let us know in the comments section below.
Read NextNordic Ribbons Baby Quilt Pattern

