Independence Day Potholders
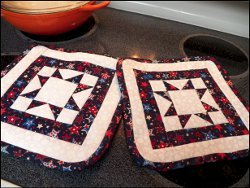
Indepedence Day Potholders
Learn how to make quilted potholders with this easy star quilt pattern. In red, white, and blue fabrics, you can sew Independence Day Potholders to add an extra patriotic touch to your kitchen. Use insulating batting to make these oven mitts safe!
Project TypeMake a Project
Primary TechniquePieced

Materials:
- Fabric A (background fabric)
- Fabric B (star fabric)
- Backing fabric
- 1 yard bias tape for each potholder
- Fusible felt
- Insul-Brite or other insulating material (optional)
Instructions:
- For each potholder cut:
four 1-1/2 x 2-5/8 inch rectangles from Fabric A
eight 1-1/2 x 1-1/2 inch squares from Fabric B
four 1-1/2 x 1-1/2 inch squares from Fabric A
one 2-5/8 x 2-5/8 inch square from Fabric A
two 1-1/2 x 4-7/8 inch rectangles from Fabric B
two 1-1/2 x 7 inch rectangles from Fabric B
two 1-1/2 x 7 inch rectangles from Fabric A
two 1-1/2 x 9 3/8 inch rectangles from Fabric A

- Right sides together, place one Fabric B square on one Fabric A small rectangle, matching corners on one end. Beginning at the point where my finger is, sew from one corner of the square diagonally to the other. You can crease the fabric with your fingernails or draw a line to help you. Trim and press open.


- With right sides together, place another Fabric B square at the other end of the Fabric A rectangle. Beginning at the inside corner again, sew from one corner of the square diagonally to the other. Trim and press open. You've now made one flying geese rectangle! Make three more.


- Attach two of your flying geese rectangles to opposite sides of the Fabric A large square. Pin right sides together, matching corners. Sew in a 1/4 inch seam (use the same seam width throughout) along the long end of the flying geese rectangle, sewing just over the top of the point (where the seam ripper is pointing). Press open.


- Sew a small Fabric A square to each end of the other two flying geese rectangles. Press open.


- Attach the last two flying geese rectangles to the two open sides of the large Fabric A square, making sure you match the seams. Press open.

- Your block should now look like this!

- Sew a shorter Fabric B rectangle onto two opposite sides of the block. Press open.


- Sew the longer rectangles onto the two open sides of the block and press open.


- Sew the shorter of the Fabric A rectangles left to opposite sides of your block. Press open. Sew the longer rectangles on the two open sides and press open.

- Cut a piece of backing fabric, a piece of fusible felt, and an optional piece of Insul-Brite the size of your block. Fuse the felt to the back of your block, layer the Insul-Brite under this, and the backing on the bottom. Pin in place.

- To quilt, I used what's called "stitch in the ditch." The idea here is to sew exactly in the "ditch" of each seam - put your machine on very slow and it's not too hard to get the hang of. An alternate quilting method would be to sew just outside each seam in an outline quilting stitch.

- When finished quilting, fold the potholder in quarters and cut a rounded corner.


- Apply bias tape and you have a potholder! Here's a view of the back.


Read NextFourth of July Table Runner

