Sunshine Slice of Life Baby Quilt
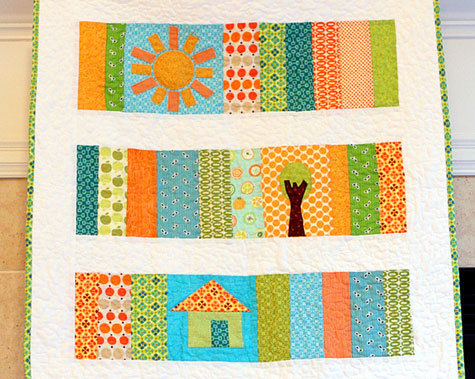
Make every trip comfortable for your baby with the sunshine-inspired brightness of this baby quilt pattern. The Sunshine Slice of Life Baby Quilt is a colorful combination of pieced quilt block patterns and applique quilt designs created easily with templates from Fiskars. Quilts with a summer theme can also be used year round, especially when they're this cheerful. Design a stroller quilt for your little one or for an expecting mother. Such an easy baby quilt pattern allows you to use any color scheme you'd like, and it's just as easy to improve the shapes and characters included in your quilt block patterns.

I love “no rules” quilting – or just making it up as I go, with a basic idea (or sketch!) in mind.

I wanted this quilt to work as a “stroller quilt” for my baby-on-the-way. It needed to be gender neutral in color (and to match my orange stroller!), and also be fun and happy in design. I used a few different Fiskars Shape templates to create my sun and tree blocks, and then pieced together my house block to finish off my “You are my Sunshine” theme. Take this basic quilt sketch and turn it into anything you like – change the color scheme and/or create different focal point block designs… Just have fun!
Note: My finished quilt measures 30 x 31 inches. To work from the sketch and increase the size of your finished quilt, simply make your rows of rectangle patches longer and/or add additional rows of rectangles (i.e. 4 or more instead of my 3).
Materials:
- Rotary Cutter
- Mat
- Fiskars circle shape template and oval shape template
- Scissors
Instructions:
1) Start by using the Fiskars rotary cutter and mat to trim three blocks of fabric for your focal block bases (trim to 7.5 inches tall by 5.5 to 8 inches wide).
2) For the “Sun” block: Use the Fiskars circle shape template to trim a circle from orange fabric. Place circle in the middle of the block, trim rectangle strips (rays) from orange fabric and arrange around sun. Pin all in place and use a straight top stitch (close to edges of design) to appliqué to block. Don’t worry about edges fraying later when washed – this will add to the charm of the quilt.
3) For “Tree” block: Use the Fiskars oval shape template to trim an oval from green fabric. Trim trunk from brown fabric – I sketched my trunk shape onto paper, trimmed the paper and then traced onto my brown fabric.

4) Arrange your “tree” onto the center of your block. First pin green oval only and appliqué using a close zig-zag stitch around the oval. Then arrange your trunk back into place, pin and and appliqué using a close zig-zag stitch around the edge.
5) For “House” block: I pieced my block together from the starting point – there are many tutorials online that can walk you through the steps. To create a similar block you could also just trim the square and triangle shapes using Fiskars microtip No. 5 scissors and appliqué in place.

6) After your focal blocks are created, trim the rectangles that will go next to them. All rectangles should be 7.5 inches tall – width is up to you! (each of my finished rectangle strips measured 7.5 tall x 24 inches long.
7) Arrange rectangles with focal blocks, similar to sketch shown, and then sew together using ¼ inch inseams. Press seams all in one direction on backside.
8) After three rectangle rows are finished, trim white “sashing” to go in between and around. Sashing strips should be 3.25 inches in width.

9) Trim 2 pieces the length of your rectangle rows. Place between rectangle rows, pin and sew all together with ¼ inch inseams. Press seams all in one direction.
10) Trim sashing strips for top, bottom, and sides of quilt top. Pin and sew, then press seams.

Congrats, your quilt top is finished!
Using the basic directions from my “How to Quilt” article: - layer backing fabric, batting, and quilt top – baste in place – and then quilt. I used a “stipple” or freemotion quilting stitch/technique. You could also just straight stitch around rectangle rows and in between blocks.
Continue following “how to quilt” ariticle instructions to bind your quilt. Enjoy your finished quilt!
Read NextHomespun Baby Quilt
Your Recently Viewed Projects
mollymoo4u 4949140
Jun 11, 2013
I would call the quilt, "A slice of life"....since all of the blocks appear to be sliced, or " A splice of life", since splicing together would complete that section of your life.
samtaylorcjsmimi 3 731660
Jun 11, 2013
What a bright & fun quilt. I would call it "A Beautiful Day in the Neighborhood"! Thanks for the chance to win. :)
janmccoy 5765933
Jun 10, 2013
I would call it: From Now On because it is about the beginning of a journey for a new life.
corgigirl7 0983621
Jun 10, 2013
My first thoughts after seeing all of the bright colors (especially the orange colors) reminded of that delicious treat that kids both young and old like to eat on a hot summer day...the Popsicle!
deborah jodine
Jun 10, 2013
I also like the name "Prairie House" - a house with just one tree and the beautiful sun shining down on the prairie.
deborah jodine
Jun 10, 2013
When my youngest daughter was little, she always drew pictures of a house, a tree and a sunshine! This quilt reminds me so much of her drawings! "Sunshine Manor"
Intrepid Meredith
Jun 10, 2013
Reminds me of a children's song that I've heard folk singer Pete Seeger sing: "May There Always Be Sunshine" :) "May there always be sunshine. May there always be blue skies. May there always be Mama. May there always be me."
zetteb13 7105579
Jun 10, 2013
Very cute!!!! the first thing that came to my mind was "Oh! Happy Day"
handanhosgoren 149 5490
Jun 10, 2013
Little Farm Garden, Little Farm Yard, Little sunny Garden, Farm Yard
Report Inappropriate Comment
Are you sure you would like to report this comment? It will be flagged for our moderators to take action.
Thank you for taking the time to improve the content on our site.

