Rail Fence Picnic Quilt
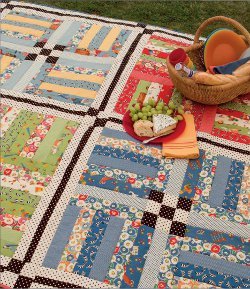
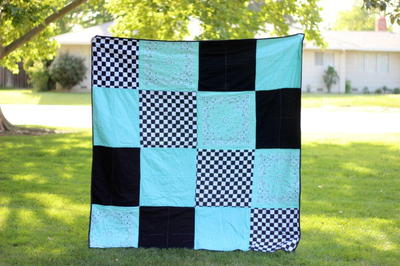
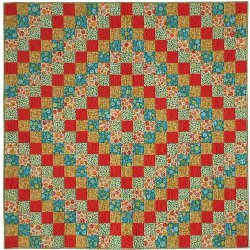
Finding free jelly roll quilt patterns for summer jelly rolls is easy! Try this Rail Fence Picnic Quilt. This picnic blanket pattern combines rail fence blocks with nine patches and a bold black and white sashing for a quilt with a retro feel. Your color scheme can be inspired by your favorite summer items; with your colorful jelly roll quilt patterns and the intricate look of multicolored rail fence quilt pieces running throughout your pattern, any outdoor setting will feel a little bit more glamorous and bright.
Project TypeMake a Project
Quilt Size64.5 inches wide x 64.5 inches long
Time to CompleteA week or two
Primary TechniquePieced

Note: Yardage and strips are based on 42"-wide fabric. Rolls of 20 precut 2-1/2"-wide strips are commonly available in quilt shops. Two rolls will provide you with the required number of strips for this project, although the number of strips needed in each color for this project may not be the same as those in the bundle. You can cut your own strips from standard yardage, if desired. Cut the strips 2-1/2" x 42". Also, if the strips from your bundle or yardage are shorter than 42", you will need more strips than the amount listed.
MATERIALS:
- 1-3/4 yards of off-white fabric for block centers, pieced sashing, and pieced border
- 7/8 yard of black fabric for block centers, pieced sashing, and pieced border
- 12 assorted red precut 2-1/2"-wide strips for blocks and binding
- 12 assorted blue precut 2-1/2"-wide strips for blocks and binding
- 8 assorted green precut 2-1/2"-wide strips for blocks
- 6 assorted light blue precut 2-1/2"-wide strips for blocks
- 2 assorted yellow precut 2-1/2"-wide strips for blocks
- 4 yards of fabric for backing
- 70" x 70" piece of batting
CUTTING:
From the black fabric, cut:
- 3 strips, 2-1/2" x width of fabric; crosscut into 38 squares, 2-1/2" x 2-1/2"
- 12 strips, 1-1/2" x 26-1/2"
From the off-white fabric, cut:
- 3 strips, 2-1/2" x width of fabric; crosscut into 34 squares, 2-1/2" x 2-1/2"
- 24 strips, 2" x 26-1/2"
MAKING THE BLACK AND WHITE UNITS:
- Sew five black and four off-white 2-1/2" squares together to form a nine-patch unit. Press the seam allowances as indicated. Repeat to make a total of four units for the block centers.

- Sew two black and two off-white 2-1/2" squares together to form a four-patch unit. Press the seam allowances as indicated. Repeat to make a total of nine sashing cornerstone units.

- Sew a black 1-1/2" x 26-1/2" strip between two off-white 2" x 26-1/2" strips. Press the seam allowances toward the black strip. Repeat to make a total of 12 sashing/border strip sets.

MAKING THE BLOCKS:
- Sew together six light blue and two yellow precut 2-1/2"-wide strips along the long edges to make a strip set. Press the seam allowances open or to one side. Cut the strip set into four segments, 10-1/2" wide. Repeat with the red, blue, and green precut 2-1/2"-wide strips. Set aside the remaining blue and red strips for the binding.

- Sew a light blue segment to the right side of a nine-patch unit, stopping the seam halfway down the unit. You will complete this portion of the seam later. Press this seam allowance and all the remaining block seam allowances toward the strip-set segments as you go.

- Sew the remaining light blue segments to the top of the nine-patch unit, followed by the left side, and then the bottom of the unit. Sew the unfinished seam from step 2.

- Repeat steps 2 and 3 with the red, green, and blue strip-set segments to make one red block, one green block, and one blue block.
ASSEMBLING THE QUILT TOP:
- Join three four-patch units with two sashing/border strip sets. Repeat to make a total of three pieced sashing/border strips.

- Join three of the remaining border/sashing strip sets and two blocks to make a block row. Press the seam allowances toward the strip sets. Repeat to make one additional block row. Join the block rows and the pieced sashing/border strips.

FINISHING:
- Piece the quilt backing so that it is 4" to 6" larger than your quilt top.
- Layer the quilt top with batting and backing, and baste the layers together.
- Quilt as desired.
- Sew the remaining red precut 2-1/2"-wide strips together end to end. Add the remaining blue precut 2-1/2"-wide strips to the end of the red strips to make a scrappy binding. Attach the binding to your quilt, using your favorite method.

Plus, check out the rest of our Summer Quilt Patterns for some sunshiney ideas this quilting season.
For more great jelly roll quilt patterns, check out our printable collection, How to Make a Jelly Roll Quilt: 9 Jelly Roll Quilt Patterns as well as another collection of 30+ Free Nine Patch Quilt Patterns + Other Nine Patch Designs!
What is a Rail Fence Quilt?
Rail fence quilt patterns are perfect for quilting beginners! As a beginner, you'll build up your skills, and as an experienced quilter, you'll be able to whip one of these up in no time. A rail fence quilt is great if you need quick quilt for a last-minute baby shower gift. If you color block the sections, you can use scraps to make one of these unique quilts.
If you like hand dying fabric, you can make a rail fence quilt that looks like it's woven instead of pieced with a gradient of colored fabrics. You can even create a block from two strips or many strips for this type of quilt. If you're using the scrap method, make sure that the width of the strips are sized to be friendly to your rotary cutter. The biggest problem you might run into with this type of quilt is your strip sets bowing when you press them. It's easiest to press as you go when it comes to making a rail fence quilt.
A rail fence quilt block is the most forgiving when you're starting out with quilting. You don't have to be perfect at any aspect of quilting with these blocks. Try out one today, even the one you can find below.
Why You'll Love This Quilt
Are you looking for a fun and stylish quilt project to work on this summer? Look no further than the Rail Fence Picnic Quilt! Here are the top 3 reasons why you should give this project a try:
1. Retro Feel: The combination of rail fence blocks, nine patches, and bold black and white sashing in this quilt gives it a retro feel that is both timeless and trendy. The colorful jelly roll quilt patterns and multicolored rail fence pieces add a touch of nostalgia to any outdoor setting, making your picnic or beach day feel a little bit more glamorous and bright.
2. Versatility: This quilt project is incredibly versatile and can be customized to fit your personal style and preferences. You can choose a color scheme that is inspired by your favorite summer items, whether it's vibrant beach umbrellas, fresh fruits, or blooming flowers. With endless possibilities for customization, you can create a one-of-a-kind quilt that reflects your unique personality.
3. Easy to Sew: Despite its intricate look, the Rail Fence Picnic Quilt is surprisingly easy to sew, making it a great project for quilters of all skill levels. The rail fence blocks and nine patches are simple to piece together, and the bold sashing adds a modern touch to the overall design. Whether you're a beginner looking for a beginner-friendly project or a seasoned quilter looking for a quick and satisfying make, this quilt is the perfect choice.
Overall, the Rail Fence Picnic Quilt is a fun and stylish project that combines retro charm with modern flair. With its versatility, easy sewing process, and vibrant color scheme, this quilt is sure to be a hit at any summer gathering. So grab your jelly roll and get ready to sew up a quilt that will be the talk of the town!
Read NextChurch Picnic Quilt
Your Recently Viewed Projects
Kaylee Renae
Mar 11, 2016
I don't think I would be able to use this as a picnic quilt. It is way to fancy to spill sandwich pieces on. LOL
jeannettecmemories 6497298
May 02, 2016
I agree but I did this quilt using various black, white and yellow strips. I added an extra six inch border and made it into a lap quilt.Absolutely awesome!!!
Report Inappropriate Comment
Are you sure you would like to report this comment? It will be flagged for our moderators to take action.
Thank you for taking the time to improve the content on our site.

