Miniature Rail Fence Quilt Pattern with Video Tutorial
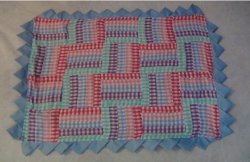
In this video tutorial, Carolyn Wainscott demonstrates how to make a miniature rail fence quilt pattern. Follow her directions to make your own mini quilt with 5-inch blocks, or use the tutorial to make a full-size rail fence quilt with 10-inch blocks.
Project TypeMake a Project
Quilt Size22 inches wide x 27 inches long
Time to CompleteWeekend project
Primary TechniquePieced

MATERIALS:
- 1/4 yard EACH from 5 fabrics [42”-45” wide]
- 22” by 27” fabric for quilt back
- batting
- binding, lace, or ruffle to finish after quilting
INSTRUCTIONS:
- Cut 1-1/2” strips from each fabric across width [cut 3 strips from each fabric].

- Create 3 identical strip sets by sewing one strip of each fabric together.
- Press seams in one direction.

- Cut 5-1/2” blocks from strip sets. Blocks will be 5-1/2” square.

- Arrange blocks to create rail fence pattern:

- Sew blocks together.
- Finish by quilting and binding. Find instructions for sewing a border of continuous prairie points here.
VIDEO TUTORIAL:
MATERIALS FOR QUILT WITH 10" FINISHED BLOCKS:
- 2 yards EACH of 5 fabrics
- 80" by 80" backing fabric
- batting
- binding, lace, or ruffle to finish after quilting
INSTRUCTIONS FOR QUILT WITH 10" FINISHED BLOCKS:
- Cut each strip 2-1/2" wide.
- Create identical strip sets as for 5-1/2” blocks.
- Press seams in same direction.
- Cut 10-1/2” sections from strip sets; blocks will be 10-1/2” square unfinished. Each strip set will give you 4 blocks. 16 strip sets = 64 blocks = 80” by 80” quilt top.
Read NextFarmhouse Four Patch Quilt Tutorial
Your Recently Viewed Projects
daniellec2003 2473 028
Sep 04, 2012
i think it whould be cute blankit for a baby done on a baby print or older kids
Report Inappropriate Comment
Are you sure you would like to report this comment? It will be flagged for our moderators to take action.
Thank you for taking the time to improve the content on our site.

