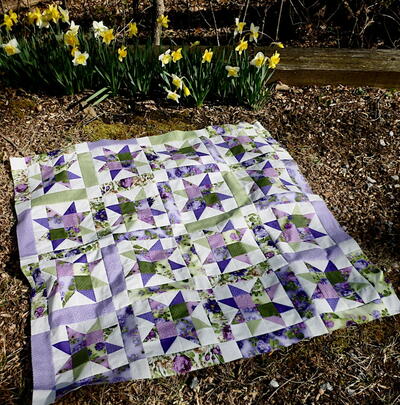
Easy Lone Star Quilt

Inspired by the traditional Lone Star Quilt, this quilting project comes together quickly and easily. Perfect for showcasing your favorite fabrics, this 50-inch square pattern, makes a beautiful wall hanging or a wonderful lap quilt. With an estimated completion time of about 12 hours, this quilt combines both tradition and efficiency, allowing you to create a stunning piece of art in a short amount of time. Whether you're looking to add a decorative touch to your home or make a cozy gift, this Lone Star Quilt project is a versatile and rewarding choice.
Time: about 12 hours.
Finished Size: 50 1/2 inches x 50 1/2 inches

Materials List
-
Janome Supplies Required:
- Blue Tip Needle (Part #200346007)
- Clear View Quilting Foot and Guide Set (Part #202089005)
-
Fabric and Notions Required:
- 1 1/4 yards White Cotton Quilting Fabric
- 1 1/4 yards Black Cotton Quilting Fabric
- 1 yard Red Cotton Quilting Fabric
- Rotary Cutter/Ruler/Rotary Cutting Mat
- Basic Sewing Supplies
- Cotton Quilting Threads
INSTRUCTIONS
Cutting Instructions:
-
From the fabric cut the following for the center star:
- • 4 strips of white fabric at 2 1/2” x WOF (width of fabric)
- • 6 strips of black fabric at 2 1/2” x WOF
- • 6 strips of red fabric at 2 1/2” x WOF
-
From the white fabric cut the following for the setting blocks:
- • “A” sections: 4 squares cut at 12 1/4” x 12 1/4”, then cut on the diagonal to make 2 triangles from each square. Total of 8 triangles.
- • “B” sections: 4 squares at 8 3/4” x 8 3/4”, then cut on the diagonal to make 2 triangles from each square. Total of 8 triangles.
-
For the borders cut the following:
- • White fabric (Inner-most border): 4 strips at 1 1/2” x WOF
- • Red Fabric (middle border): 5 strips at 2 1/2” x WOF
- • Black Fabric (outer border): 5 strips at 3 1/2” x WOF

Machine Setup:
-
Set seam allowance for a 1/4” seam. Shown on the Janome Horizon Quilt Maker Memory Craft 15000 is Stitch #2 under Quilting (Q). Needle position adjusted to 8.7, Stitch Length to 2.30.
-
Foot used is the Clear View Quilting Foot and Guide Set with a 1/4” guide set in place. Needle used for piecing is the Blue Tip Needle.
-
Use a coordinating top and bobbin thread to avoid showing through the white fabric.6 strips of Cut off the bottom of the bag with a rotary cutter.


Sewing Instructions:
-
Using a 1/4” inch seam allowance, stitch together the strips along the fabric length in the following order:
- • Group #1: Black, White, Red, Black
- • Group #2: White, Red, Black, Red
- • Group #3: Red, Black, Red, White
- • Group #4: Black, Red, White, Black
-
Press seams to one side.
-
Using a quilter’s cutting ruler, rotary cutter, and mat, lay fabric along one long width of the quilting mat, and place the ruler at a 45 degree angle as shown in the photo.
-
Cut off excess fabric to make the 45 degree angle raw edge.
-
Using the same ruler, lay ruler across the remaining width of fabric at the 45 degree angle using a 2 1/2” wide as shown. Cut 8 strips from each grouping of fabric, all on the 45 degree angle and using a 2 1/2” strips.
-
After all cuts have been completed, temporarily lay out each diamond portion of the star, staggering each strip to allow for design layout. Strips will be laid out with a strip from each group in order of 1, 2, 3, 4. See diagram on last page for reference.
-
Once again using the 1/4” seam allowance, sew each strip into the grouping as outlined above in Step #6 to make the diamond shape. Strips will make 8identical diamond sections for the layout.
-
Following the diagram for the quilt layout on the last page, attach one “B” triangle unit and one “A” triangle unit to each side of the diamond unit as shown. This will make
a large triangle that includes one diamond unit, one “A” unit, and one “B” unit. After completing each diamond unit, make sure the edges are straight, and if necessary, use the rotary cutter, ruler and mat to even up the edges. -
Using a 1/4” seam allowance, attach two completed diamond units down the “A” diagonal line to make a large square for one-quarter of the finished star.
-
Attach all four quarter pieces together to complete the quilt center.


Attaching the Borders:
-
After pressing quilt center, measure to confirm sizes of inner, white border. Measurements for border strips should be 1 1/2” x 39” for side borders. Top and bottom borders should be 1.5” X 40 1/2” each. Attach side borders first, press seams, then follow with attaching top and bottom border. Press seams toward borders.
-
For the middle red border, measurements should be at 2 1/2” x 41” for the side borders. Top and bottom border should measure at 2 1/2” x 44 1/2” and may need to be pieced to meet measurements. Attach side borders first, press seams towards the red border, then follow with attaching top and bottom border. Press seams toward red border.
-
The outside black border should measure at 3 1/2” x 45” for side borders. Top and bottom borders measure at 3 1/2” x 50 1/2”. Attach side borders first, press seams towards black border, then follow with attaching top and bottom border. Press seams towards the black border.
NOTE: All border strips can be pieced in order to meet required measurements. Be sure to measure quilt at each border interval to confirm sizes. Sizing can be different between quilts often due to 1/4” seam allowance variations.
Finishing the Wall Hanging:
-
Make a quilt sandwich by layering the top, batting, and preferred backing. Stitch as desired to attach all layers. Pictures shown reflects quilt being completed using ruler work and free motion techniques.


Reference:
-
The following diagram shows how to lay out each group of stitched fabric strips in order to complete the diamond unit. The strips are cut and then laid out on the 45 degree angle in order to complete the diamond. All diamond units are made exactly the same with Group #1 at the bottom, followed by #2, #3, #4.
-
Using a 1/4” seam, attach triangle “B” to diamond unit first using caution to line up the top point of the diamond unit with the top point of the “B”mtriangle. Press towards “B”. Next, attach “A” onto the diamond and trian- gle “B” unit. Press seam to “A” unit.
If necessary, edges may need to be trimmed down on “A” through diamond in order to straighten unit before attaching to another diamond unit. -
Your project is finished! If you love this tutorial, be sure to check out Janome.com for even more inspiration.


Read NextL'Amore E'Bello Panel Quilt